This is a landmark day. Remember this day, because this is the day I finished my Spanish Dancer cross stitch.
This project has been ongoing for literally years. Here's a couple of pictures of me working on it at different times:
Since I started this project I have moved house four times, moved to France and back, have fallen in love and settled down with the loveliest man I could have found, I've had five different jobs, learnt an entire language, broken my arm twice (a possible excuse for having taken so long to complete this project), people I know have died and been born, I've made new friends and lost old ones, the shop I bought the cross stitch kit from closed... And through all of this, one thing has remained constant... my slow progress with the Spanish Dancer.
Well, here she is:
It's been an enjoyable project, though a slow one.
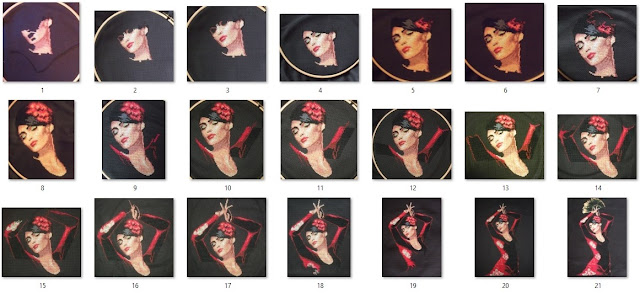
Here's some photos I took of the progress I was making over the years:
The Lanarte kit I bought back in what must have been 2008 or 2009, I think, cost about £50. I've put hours of work in to it, and love the image itself, so it's priceless to me now.
It's a very large image, measuring 30 x 50cm, so I had to keep track of where I was up to by marking off the stitches I'd already done on the chart that comes in the pack. I did this with a highlighter pen, but as you can see in the photo below, I had to double check I'd not made any mistakes in some areas of the cross stitch and went over the chart again with a pen.
The kit came with the chart, the threads needed (and there was more than enough of each colour to complete the project without needing to buy more), the fabric and a needle.
I also had to use an embroidery hoop and provided my own scissors, but basically with these kits you're good to go as soon as you buy them.
Now all that's left for me to do is decide what I want to do with my finished piece. Ideas are welcome, so let me know if you have any!
I've thought about turning her in to a cushion, or framing her; but there's another idea that popped in to my head which particularly appeals, and that is to put her on a padded memory-box lid. I'm thinking of a box with hinges. If you've ever seen Little Women, something rather like the memory boxes each of the girls has in the attic. It seems like a fitting end for this lovely lady, since she's been through so much with me and is a memory in herself, so why shouldn't she guard my other bits and bobs collected over the years?
Here are the last two pictures I took of my progress on the project.
I particularly like the shading effects and all the details on this cross stitch; and though it was difficult to do in places because I kept needing to change colour, I think you'll agree that the end product is really something quite special. So here are some close-ups of the detail.
I particularly like the shading of her eye-shadow and lips, and love the contrast of colours with the black background.
I think my next cross stitch project will be something a little less demanding and probably smaller so that I'm motivated to finish it quicker, but I might do another large project some time as it is very satisfying to see the progress, even if it does take a long time to complete.
And just one little tip for you wannabe cross stitchers out there... Don't drink and stitch... You'll make mistakes and have to mop up the mess with a hangover, so just... don't.
This blog is to share my craft ideas and inspirations and tell you about the things I've tried to make, the successes and the failures!
Tuesday, 22 March 2016
Monday, 21 March 2016
Grey Knitted Hat and Scarf
I haven't posted for a while because moving country and settling in to a new home has been taking up most of my energy. But I'm back, and I'm motivated to bring you more craft posts!
Today I finished a project I've been working on on-and-off during the move: a nice warm scarf and hat for my partner.
I used a nice soft wool, because there's nothing worse than having an itchy neck. It's got a nice stretch in it too.
I think I made the hat a little big because I went with the average size suggested in my knitting book instead of trying my hand at measuring his head and altering the pattern to fit, but it still looks good, and at least it's not too small!
The scarf was a nice de-stressing project to pick up at moments when I had time during the move, and since it's just a straight-forward scarf with no embellishments, I didn't have to keep track of a pattern, so it was an ideal project to be getting on with from time to time without losing where I was with it.
I did have a problem with it a few days ago however! Since I've not been knitting it very regularly I'd put it aside and tidied up and when I came back to it half of the stitches on the last row I knitted had slid off. I tried patiently looping the stitches back on the needle, which I thought had worked, until I continued knitting and realised I'd knit two rows together and it looked a mess. I looked in my knitting book to see how to rectify this kind of mistake but it didn't mention a solution to this particular problem.
I didn't take a photo of it at the time, because I was very frustrated and ready to just undo the whole thing, when I was struck by a brain-wave. My experiment paid off!
I decided to try picking up one of the previous rows I'd knitted correctly by weaving the other knitting needle through one of the rows. I chose one a little way down from where I'd gone wrong (about 5 rows down) in case it started unravelling while I worked.
Once I'd got the knitting needle through each loop (picking up the parts of the stitches which look like the tops of little waves, as you can see in the pictures) and counted how many stitches there were to verify I still had the correct amount, I unravelled the work I'd done above it. I waited with baited breath to see if it worked, and it did!
I was then able to continue knitting from this row; and although the stitches were a little tighter to work from, the second row I knitted was back to normal. Phew!
This trick also came in handy a little while later when I made a mistake while casting off.
I was really pleased with the end result, and particularly pleased with the casting off, which I managed to keep loose enough to not bunch up at the end.
So there you have it, my first adult sized hat and scarf!
Subscribe to:
Posts (Atom)