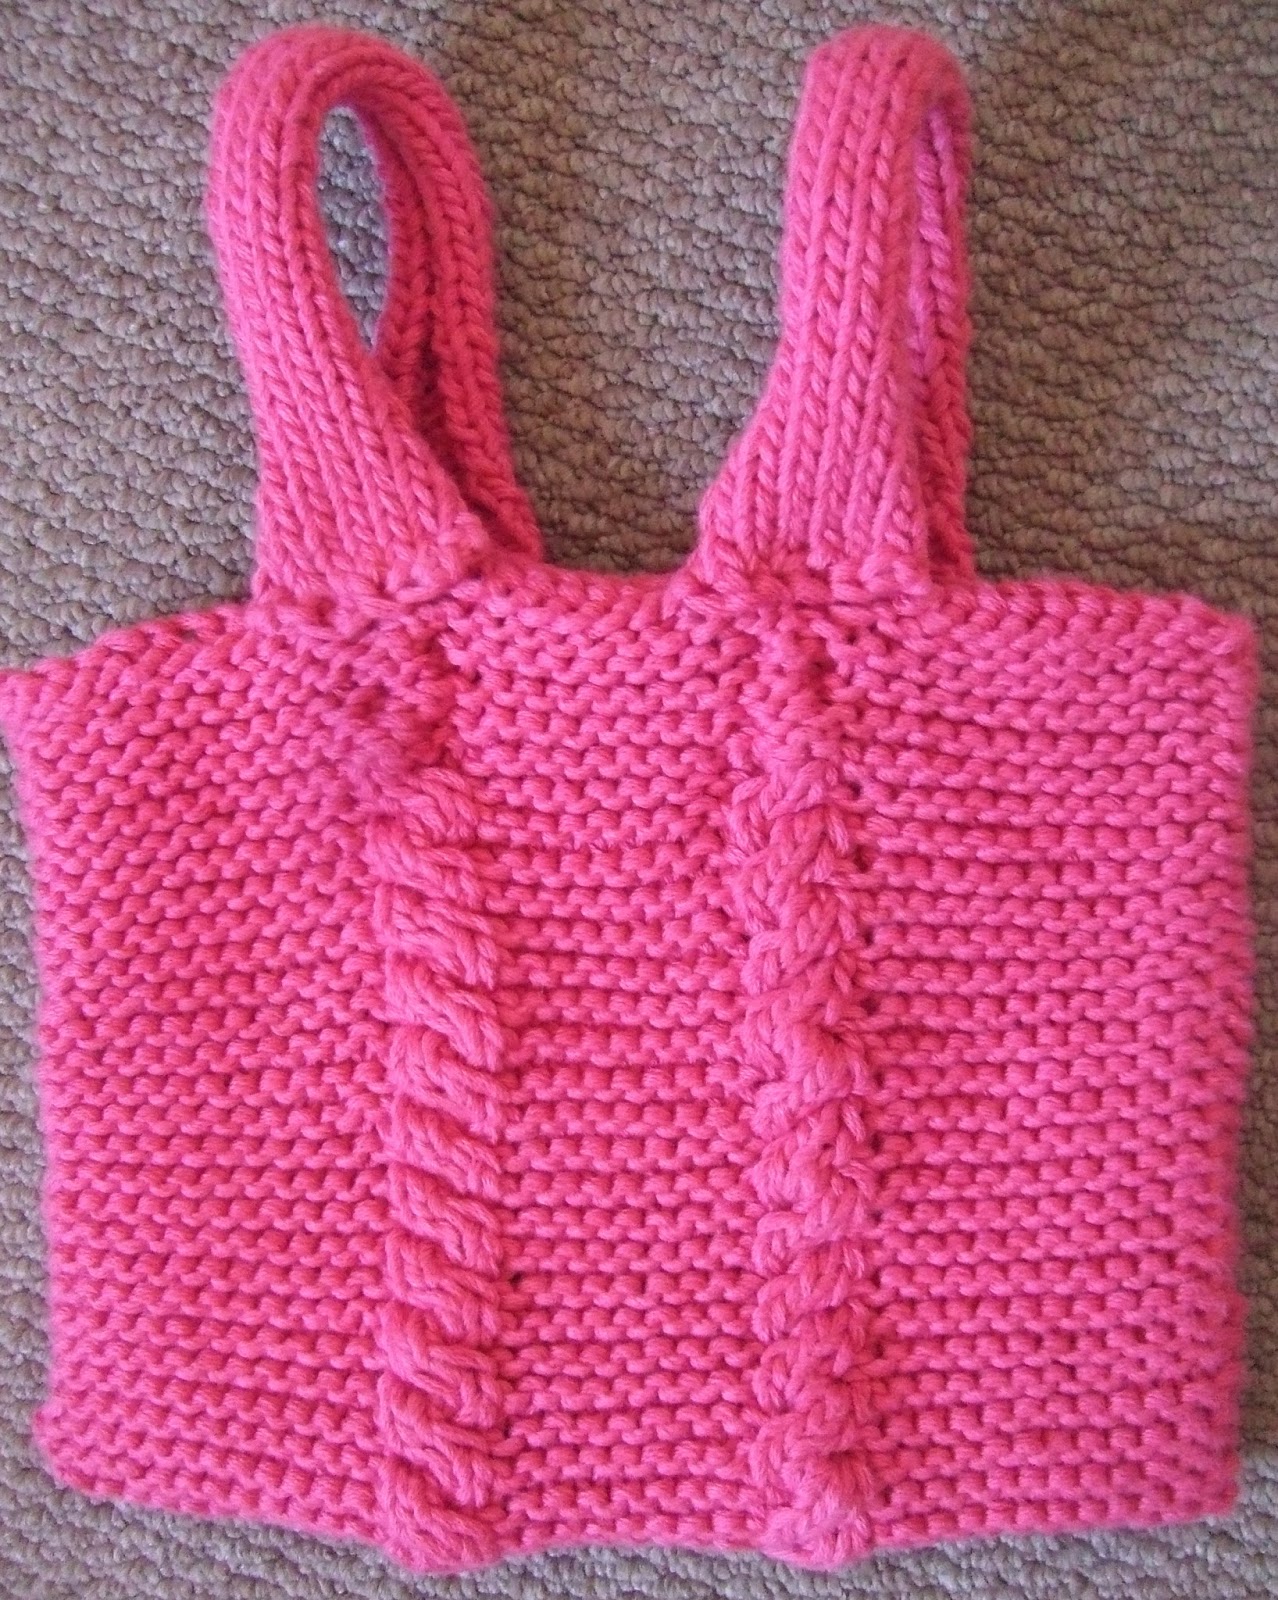
This is my first attempt at cable stitch, and it turned out quite well I think! I followed one of the projects in my Knitty Gritty (knitting for the absolute beginner) book by Aneeta Patel.
There are a couple of mistakes on the bag, but I'm trying not to be too much of a perfectionist and remember that I'm only a beginner, so mistakes are normal, and it hasn't affected the look of the bag too much.
The main mistake I made with the bag is that I accidentally put an extra row of knitting in at some point which turned the cable stitch to the other side of the bag, as you can just about see in the picture below. But since it's near the handles, it's not very noticeable, so I don't really mind.
Also, when stitching on the handles, I attached them to each side of the bag instead of giving each side of the bag its own handle. It's not really a mistake as such, because it works, but it's not what was suggested in the book and was an absent-minded change to the pattern suggested. The book doesn't actually explain how to sew the handles on in detail so I sort of made it up as I went along, but you can't actually see the stitches used to attach the bag so I think I did a good job with it.

At some point I had a major disaster when I got to the end of a row and counted the stitches... I'd dropped a stitch at some point without realising but then couldn't see in the pattern where it was. I did undo the row carefully and found what I thought was the dropped stitch. It took a lot of creative thinking and I thought I'd rectified it correctly until I knitted the next row and noticed a random big loop in the row below, but apart from it looking a little odd, it's not very noticeable and the work isn't going to unravel, so never mind!
I like the look of this little bag and was pleased with the finished product. You can adjust this pattern quite easily to make bigger or smaller bags as needed, so I'd definitely experiment with this technique now I know how to do it!
This is a landmark day. Remember this day, because this is the day I finished my Spanish Dancer cross stitch.
This project has been ongoing for literally years. Here's a couple of pictures of me working on it at different times:

Since I started this project I have moved house four times, moved to France and back, have fallen in love and settled down with the loveliest man I could have found, I've had five different jobs, learnt an entire language, broken my arm twice (a possible excuse for having taken so long to complete this project), people I know have died and been born, I've made new friends and lost old ones, the shop I bought the cross stitch kit from closed... And through all of this, one thing has remained constant... my slow progress with the Spanish Dancer.
Well, here she is:
It's been an enjoyable project, though a slow one.
Here's some photos I took of the progress I was making over the years:
The Lanarte kit I bought back in what must have been 2008 or 2009, I think, cost about £50. I've put hours of work in to it, and love the image itself, so it's priceless to me now.
It's a very large image, measuring 30 x 50cm, so I had to keep track of where I was up to by marking off the stitches I'd already done on the chart that comes in the pack. I did this with a highlighter pen, but as you can see in the photo below, I had to double check I'd not made any mistakes in some areas of the cross stitch and went over the chart again with a pen.
The kit came with the chart, the threads needed (and there was more than enough of each colour to complete the project without needing to buy more), the fabric and a needle.
I also had to use an embroidery hoop and provided my own scissors, but basically with these kits you're good to go as soon as you buy them.
Now all that's left for me to do is decide what I want to do with my finished piece. Ideas are welcome, so let me know if you have any!
I've thought about turning her in to a cushion, or framing her; but there's another idea that popped in to my head which particularly appeals, and that is to put her on a padded memory-box lid. I'm thinking of a box with hinges. If you've ever seen Little Women, something rather like the memory boxes each of the girls has in the attic. It seems like a fitting end for this lovely lady, since she's been through so much with me and is a memory in herself, so why shouldn't she guard my other bits and bobs collected over the years?


Here are the last two pictures I took of my progress on the project.
I particularly like the shading effects and all the details on this cross stitch; and though it was difficult to do in places because I kept needing to change colour, I think you'll agree that the end product is really something quite special. So here are some close-ups of the detail.
I particularly like the shading of her eye-shadow and lips, and love the contrast of colours with the black background.
I think my next cross stitch project will be something a little less demanding and probably smaller so that I'm motivated to finish it quicker, but I might do another large project some time as it is very satisfying to see the progress, even if it does take a long time to complete.
And just one little tip for you wannabe cross stitchers out there... Don't drink and stitch... You'll make mistakes and have to mop up the mess with a hangover, so just... don't.
I haven't posted for a while because moving country and settling in to a new home has been taking up most of my energy. But I'm back, and I'm motivated to bring you more craft posts!
Today I finished a project I've been working on on-and-off during the move: a nice warm scarf and hat for my partner.
I used a nice soft wool, because there's nothing worse than having an itchy neck. It's got a nice stretch in it too.
I think I made the hat a little big because I went with the average size suggested in my knitting book instead of trying my hand at measuring his head and altering the pattern to fit, but it still looks good, and at least it's not too small!
The scarf was a nice de-stressing project to pick up at moments when I had time during the move, and since it's just a straight-forward scarf with no embellishments, I didn't have to keep track of a pattern, so it was an ideal project to be getting on with from time to time without losing where I was with it.
I did have a problem with it a few days ago however! Since I've not been knitting it very regularly I'd put it aside and tidied up and when I came back to it half of the stitches on the last row I knitted had slid off. I tried patiently looping the stitches back on the needle, which I thought had worked, until I continued knitting and realised I'd knit two rows together and it looked a mess. I looked in my knitting book to see how to rectify this kind of mistake but it didn't mention a solution to this particular problem.
I didn't take a photo of it at the time, because I was very frustrated and ready to just undo the whole thing, when I was struck by a brain-wave. My experiment paid off!
I decided to try picking up one of the previous rows I'd knitted correctly by weaving the other knitting needle through one of the rows. I chose one a little way down from where I'd gone wrong (about 5 rows down) in case it started unravelling while I worked.
Once I'd got the knitting needle through each loop (picking up the parts of the stitches which look like the tops of little waves, as you can see in the pictures) and counted how many stitches there were to verify I still had the correct amount, I unravelled the work I'd done above it. I waited with baited breath to see if it worked, and it did!
I was then able to continue knitting from this row; and although the stitches were a little tighter to work from, the second row I knitted was back to normal. Phew!
This trick also came in handy a little while later when I made a mistake while casting off.
I was really pleased with the end result, and particularly pleased with the casting off, which I managed to keep loose enough to not bunch up at the end.
So there you have it, my first adult sized hat and scarf!
Just sharing a proud moment. I've continued with the knitting and have made a little set of baby items (booties, hat and snood) which my colleague is giving to her brother when her nephew is born.
They're not perfect; I can tell the casting on is a bit too loose, but they're pretty good for a first attempt!
The sewing up is quite tricky, and I think I need to improve my skills, but it doesn't look too bad.
The hat was such a success that my boyfriend asked me to sew one for him too, so look out for an update on that soon!
I really felt like I'd accomplished something special with this one too, because I got to do something more difficult for the boarder and got good practise with decreasing, and I finished it in a few short days; doing a bit each evening after work.


Front and back of the baby hat.
The snood was a complete experiment as I didn't use a knitting pattern for it. I basically just started knitting a scarf and rather than continue and make it longer, I cast off and sewed the two ends together. It turned out quite nicely.
Inside of the snood.
Outside of snood.
I'm going to keep up with the knitting and will update with new projects as I continue to improve.
Fellow beginner-knitters, putting 30 minutes in to knitting every day really does help, and baby items are perfect practise: small and simple!
First of all, I have to admit that I had some help from my lovely boyfriend for this project, but only because I had never used the wood board and cutter knife before.
We had a run-down mini ironing board and rather than throw it out I decided it would be fun to repurpose it as an inspiration board / notice board.
For this project I needed:
The old ironing board, wood board (I'm not sure of the exact translation of this type of board, in French it's carton-bois, if you know what the proper English translation is, please let me know!), acrylic paint, split pins, a glue gun, super-glue, cork board, sting and mini clothes pegs.
First of all, I traced around the shape of the ironing board frame on the wood board and my boyfriend cut out the shape using a cutter knife.
Next I painted the board with acrylic paint.
Then I made some small slits where I planned to put the split pins through the board. I had to be careful with this part to make sure the split pins would go through the holes in the ironing board at the back.
Once I pushed all the split pins through I glued them down using a glue gun.
Then I cut out the shapes I desired from the cork board using the cutter knife and super-glued them where I wanted on the board.
I found some cute wooden pegs which I painted in different colours, then attached string to the board, tying it through the holes at the back of the ironing board frame, to make it look like mini clothes-drying lines.
To finish my board I printed out inspirational images and wrote inspirational quotes and backed them on to colourful paper. Et voilà! My inspiration board is finished.
A while ago I bought a book on Amazon called Knitty Gritty (Knitting for the absolute beginner) by Aneeta Patel, and a set of bamboo knitting needles.

I haven't had much spare time for crafting recently, but I have been trying my hand at knitting, when I've found a few minutes to spare, and I've become a bit obsessed.
 The book is really simple to understand and has loads of photos which are easy to follow... And I have managed to successfully make a scarf and some baby booties! I am ridiculously proud of myself and have even had an offer from someone to buy the baby booties!
For the scarf I probably made it too wide, but the extra stitches made for good practise (and I can now use it as a small blanket if I want). I didn't follow exactly what the book suggested as I wanted to practise purling as well, so I used 3 balls of XL cotton (made by DMC). I did normal knit stitches (with 6.5 mm needles) for the first and third ball, but for the middle one I did purl stitching. It looks quite nice, I think, and the purled part of the scarf is stretchier and feels somehow softer which is great as it's the part that touches the back of the neck.
Then I tried my hand at the booties... I was really surprised how easy I found these to make and managed to do each one in an evening, so having made a nice little set of booties in just two days felt very rewarding. With this one I learned how to decrease, how to do a garter mattress stitch and practised the backstitch, which I had only done with thread and material before. It was also an opportunity to use smaller sized needles too (4.5 mm).
And speaking of the needles, I really like the bamboo ones I got. I tried knitting years ago when my mum showed me how to do a basic knit stitch, but I never managed to make anything. Back then I used metal knitting needles and I can really see that bamboo is easier to work with. The wool doesn't slide off as easily which I think is really helpful for a beginner, and I just prefer the way they feel, with a little give in them.
So all in all my knitting adventure has been a good one so far!
I've now got my hands on some crochet hooks and a book on crocheting, but so far my efforts haven't borne any fruit. I also want to try some sewing, but I need to invest in materials and am going to wait a while to start that project.
So I'll leave you with one recommendation if you want to try your hand at knitting for the first time (or have forgotten how to since the last time you tried), buy Knitty Gritty... It's an excellent book! And invest in some bamboo knitting needles.
I decided to paint a picture frame to send to my dad for Father's Day last month.
I bought a simple wooden frame and painted a base coat of white around it to begin with.
I wanted to experiment with blending acrylics so I mixed a very small amount of blue in with white paint and started spreading the blue paint across the frame from one side and added a second coat of white paint from the other side. Brushing in one direction from the blue side I was able to blend these two colours quite easily. Since I was working with a small surface area the paint didn't have time to dry out during the blending and I was very pleased with the result.
I then decided to decorate the frame a little more with some black shapes; hearts and tall flowers to go with the decoration in my dad's living room.
The frame seemed a little bland so I added some colour and placed a photo of myself and my dad inside.
This was a very easy and quick project with satisfying results.
I have been experimenting with blending colour with larger surface areas and haven't been quite so successful, but I will share my experiences with that soon.