It just does one type of stitching and can only stitch through thin material, but it's perfect for a beginner wanting to practise some not-too-taxing sewing projects.
I looked on Youtube for some inspiration on how to make one, and watched several videos, but I basically ended up making it up as I went along, and it worked a treat. So here's what I did.
First of all, since I'd decided I wanted to do a patchwork pattern, I cut squares out of some
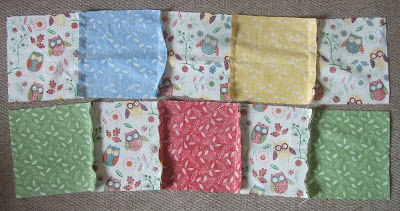
material I picked up at Hobbycraft after ironing it, using fabric scissors, and then decided how I wanted the patchwork to look by laying it out on the floor.
I was a little worried that the squares weren't perfect (I don't have the ideal measuring or cutting materials usually used for these types of projects), but that didn't seem to matter in the end.
I started sewing the squares; sewing them together wrong side out. I checked the length of the rows of squares I'd made against the door and decided I needed one more square of patchwork on each row to make it the correct length for the door. Again, I did this because this project wasn't an exact science. Had I been able to properly measure the squares and been able to do all the seams the same size, I would have been able to measure the door width and measured out the material accordingly. But this was an experiment, and experiment I did!
Once I'd sewn both rows of patchwork together I ironed down the seams on the back to make them flat.
Then I sewed together the two rows, wrong sides out.
I continued by sewing the other edge shut to make a tube and the sewed one end shut before turning the material right-way out.
I then stuffed the material with super soft toy filling (again, picked up at Hobbycraft) and double folded the open end and sewed it shut.
I'm really pleased with how it looks, and am very proud of myself for having worked out how to use the machine and how to make this little project without following specific instructions!
Also, it definitely saved on money, since buying a draught excluder would have been expensive, and my little draught-stopper is now helping to keep my home nice and cosy and warm, while looking really cute too!
Now all I have to do it decide what my next easy-to-make mini-machine project is going to be!
Then I sewed together the two rows, wrong sides out.
I then stuffed the material with super soft toy filling (again, picked up at Hobbycraft) and double folded the open end and sewed it shut.
I'm really pleased with how it looks, and am very proud of myself for having worked out how to use the machine and how to make this little project without following specific instructions!
Also, it definitely saved on money, since buying a draught excluder would have been expensive, and my little draught-stopper is now helping to keep my home nice and cosy and warm, while looking really cute too!
Now all I have to do it decide what my next easy-to-make mini-machine project is going to be!


No comments:
Post a Comment